Getting Started
The easiest way to run the model is to use Docker (a kind of virtualization software). After installing Docker, you will download the model’s Docker image hosted on DockerHub, and run the image. The image contains everything needed to run the model (NEURON, Python, MPI, all required OS and Python packages). The image will open a Jupyter Lab environment which you can use to interact with the model.
Alternatively, if you have NEURON 7.7+Python installed, you can download the model source code, install required packages, and run the model locally.
Running Dockerized Model
Install Docker
Follow the steps for your OS to install Docker on your machine.
Download the Olfactory Bulb Model Image
In your OS terminal, run the following command to download the latest model image from DockerHub:
docker pull jbirgio/olfactory-bulb:latest
Run the Image and Open Jupyter Lab
Once the image is downloaded, run the image with the following command:
docker run -p 8888:8888 jbirgio/olfactory-bulb:latest
The Docker container will start and load the image. The image is programmed to start a Jupyter Lab environment. In the terminal output, you should see a URL that looks something like:
http://127.0.0.1:8888/?token=6e7edee...0e02142
Copy and paste the URL into your browser to open the Jupyter Lab environment that is running inside the model’s Docker container.
Run the Notebook with Experiments
On the right panel of Jupyter Lab, find the notebooks folder and
open the LFP Wavelet Analysis notebook. Then run all the cells of
the notebook.
Once the simulation starts, you should see something like this (OK to ignore any ‘Mechanism imported…’ NEURON warnings):
Starting paramset: GammaSignature (1/5)...
numprocs=16
Rank Complexity min: 551, mean: 662.625, max: 791
Starting simulation...
Time: 10.0 ms
After the simulations finish, running the next cell will plot the simulation output:
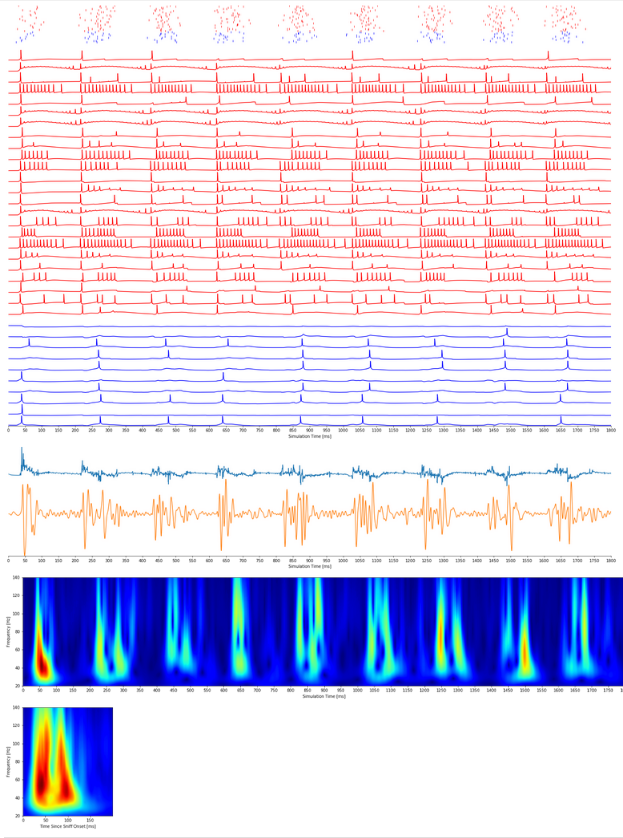
Olfactory bulb model exhibiting the two-cluster gamma frequency oscillations (bottom left)
The first row contains the odor input spikes to the glomerular tufts of mitral (blue) and tufted (red) cells.
Next are the somatic voltage traces of tufted (red) and mitral (blue) cells
The next trace is the raw LFP signal
Then the LFP signal band-pass filtered to include frequencies between 30-120 Hz
Then a wavelett spectrogram of the filtered LFP signal
Finally, the average LFP spectrogram across all the sniffs, containing the two-cluster gamma fingerprint
The remaining cells demonstrate how the gamma fingerprint is disturbed when one of the key network mechanisms is disabled.
Adjusting Parameters
The show_plots function takes the name of a parameter set Python
class.
To change the simulation parameters, use the right panel in Jupyter Lab
to open the [repo]/olfactorybulb/paramsets/case_studies.py file.
After modifying e.g. the GammaFingerprint class, rerun the
simulation with the new parameter values with this notebook command (replace
16 with the number of cores in your machine):
!cd ..; mpiexec -np 16 python initslice.py -paramset GammaSignature -mpi
After simulation completes, re-run the show_plots function to see
the updated results:
show_plots('GammaSignature', sniff_count=8)
Building and Running the Model Locally (without Docker)
Running the model locally without Docker has the following requirements:
Ubuntu 16.04 LTS
Anaconda Python 3+ (miniconda ok) is installed
NEURON 7.7+Python+MPI is working (e.g. can run
python -c 'import neuron'andmpiexec ...).
Note: NEURON must be v7.7. As of this writing, 7.8 results in NEURON seg faults.
The general steps are:
Clone the model repository
Install required python packages
Compile .mod files
Run Jupyter Lab/Notebook
The commands below are similar to those performed by the Docker file.
Consider creating a new conda environment (e.g. conda create --name obenv python=3.7) to keep the model python packages separate.
# Clone the model repository
git clone https://github.com/justasb/OlfactoryBulb; cd OlfactoryBulb;

# Install required Python packages
conda install pandas=1.0.3 -y
python -m pip install pip==9.0.3 # One of the packages requires an older version of pip
pip install -r requirements.txt

# Compile mod files (most importantly under 'prev_ob_models/Birgiolas2020/Mechanisms')
cd prev_ob_models
./compile_mod.sh # Assumes nrnivmodl is setup. This will also delete all x86_64 subfolders.
cd ..
To test the above steps, the following 1ms test simulation should run without errors:
mpiexec -np 2 python initslice.py -paramset OneMsTest -mpi
After the above steps are finished, run jupyter lab and follow the
steps to run the notebook experiments.